Download
User Rating: 4.5/5 ( 1 votes)
Vivus is a little JavaScript class (little because it's lightweight and have no dependency) to make drawing animation with SVGs in a webpage. Different animations are available, even scripting the entire SVG to do whatever you want.
Animations
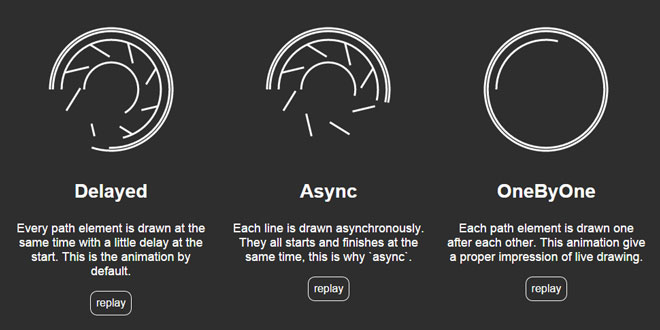
On the following images, the pink color represent the duration value, and the blue is for the delayvalue.
Delayed

Every path element is drawn at the same time with a little delay at the start. This is the animation by default.
Async

Each line is drawn asynchronously. They all starts and finishes at the same time, this is why async.
OneByOne

Each path element is drawn one after each other. This animation give a proper impression of live drawing. The duration for each line depends on their length, to make a constant drawing speed.
Principles
To make this effect, the script use the CSS property strokeDashoffset. This property manage the stroke offset on every line of the SVG. Add some JavaScript to update progressively this value, and the magic begins.
Unfortunately, there's a problem, this property is only available on path elements. Or, in a SVG there a lot of circle, rect, line, polyline... and they are breaking the animation. So an other class is available in the repo, called pathformer. It's made to transform all objects of your SVG into pathelements, to can use the property and animate your SVG.
The animation always draw elements in the same order as they are defined in the SVG tag.
There is few conditions about your SVG:
-
Every element mustn't be filled, but have a stroke (of your choice, go crazy). Because the animation is based on it
-
Do not have any hidden path elements in your SVG, Vivus consider them all eligible to be animated. So think to remove them before playing with it, or the animation might look tricky with blank and gaps.
Source: maxwellito.github.io
1. INCLUDE JS FILE
<script src="dist/vivus.js"></script>
2. JAVASCRIPT
As I said, no dependencies here. Just need to include the scripts.
new Vivus('my-svg-id', {type: 'delayed', duration: 200}, myCallback);
The Vivus constructor asks 3 parameters :
-
ID of the SVG to animate (or the DOM element)
-
Option object (described in the following)
-
Callback to call at the end of the animation (optional)
The option object must respect this structure :
-
type string
-
define what kind of animation will be used: delayed, async, oneByOne, scenario orscenario-sync
-
duration integer
-
animation duration, in frames
-
start string
-
define how to trigger the animation
-
inViewport once the SVG is in the viewport
-
manual give you the freedom to call play method to start
-
autostart make it start right now
-
delay integer
-
time between the drawing of first and last path, in frames (only for delayed animations)
-
selfDestroy boolean
-
remove all extra styling on the SVG, and leave it as original
To control the animation, three methods are available : play, stop and reset. The method play take one parameter which is the speed. This value can be positive, negative (to go backwards), or under 1 to play slowly. By default the value is 1.
3. SCENARIZE
This feature allow you to script the animation of your SVG. For this, the custom values will be set directly in the DOM of the SVG.
{type: 'scenario'}
This type is easier to understand, but longer to implement. You just have to define the start and duration of each element with data-start and data-duration attributes. If missing, it will use the default value given to the constructor.
The good point about this type is the flexibility. You don't have to respect the order/stack of the SVG. You can start with the last element, then continue with the first, to finish with all the rest at the same time.
Then define custom rules for each element in your SVG via extra attributes in your SVG DOM :
-
data-start integer
-
time when the animation must start, in frames
-
data-duration integer
-
animation duration of this path, in frames
<svg>
  <circle data-start="0" data-duration="10" ... />
  <circle data-start="20" data-duration="10" ... />
  <circle data-start="20" data-duration="20" ... />
  <circle data-start="0" data-duration="30" ... />
</svg>
{type: 'scenario-sync'}
It's not the sexiest code ever, but quite flexible. The behaviour is quite different, let's see.
By using this animation type, the default behaviour is the same as `oneByOne`. But here, you can define some properties on a specific path item. Like the duration, the delay to start (from the end of the previous path) and if it should be played asyncronously.
-
data-delay integer
-
time between the end of the animation of the previous path and the start of the current path, in frames
-
data-duration integer
-
animation duration of this path, in frames
-
data-async (no value required)
-
make the drawing of this path asynchronous. It means the next path will start at the same time.
If a path does not have an attribute for duration or delay. The default one, set in options, will be used.
For an easier debug, have a look to the attribute map of your Vivus object. This one contain the mapping of your animation. If you're using Google Chrome, I recommand you to use `console.table` to get a nice output of the array, which will make your debug easier.
 JS Tutorial


