- Overview
- Documents
SEO Friendly
SlideDeck can actually boost your SEO rankings. The content from each slide is cleanly organized in your code and is automatically indexed by search engines.
Autoplay
Automatically animate through your SlideDeck when visitors arrive on your website. Great for header sliders when used in conjunction with the slider mode option. Currently does not autoplay though vertical slides.
Slider Mode
Use SlideDeck as a traditional slider by turning off the slide title bars. Use the Slide Control API and interact with your own custom built navigation, or turn on Auto Play to automatically progress through your slides.
Full CSS Customization
Fully customize your SlideDeck to match your website’s design. Customize your skins with CSS, HTML and JS as needed.
Free Minor Version Upgrades
Get FREE minor version upgrades! You’re secure in your purchase for all future updates and feature additions within a minor version (currently 1.x).
Custom Skins
While SlideDeck comes with a beautiful design already, sometimes you want something a little different to mix it up. You can create your own custom skins to meet your needs.
Supports Premium Themes
Take SlideDeck to the next level with this premium set of themes, that are beautifully crafted to suit almost any look – from clean ultra-minimalist sites to vintage textured pages
Support
Get support directly from our team. Get responses to your support questions during business hours(M-F 8am-5pm PST). Response times may vary.
Vertical Slides
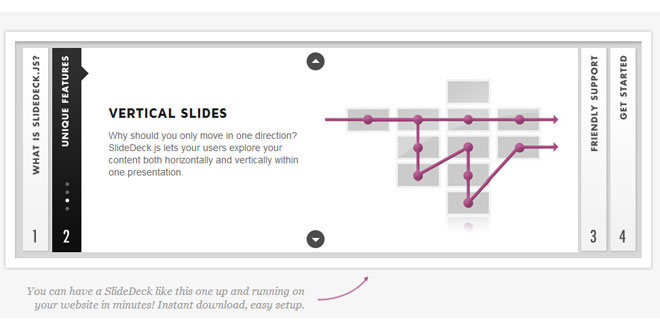
Vertical navigation adds another dimension to your content. Allow users to drill into more detail within a specific slide set without losing their place in the deck.
Touch Screen Support
Want your SlideDeck to work on mobile devices like the iPhone, iPad and Android phones? No problem, SlideDeck includes touch interaction support.
Video and Gallery Ready
Videos, Image Galleries, Music Players and any sort of media can all be placed inside the slides of SlideDeck. Depending on what type of media you are putting in your SlideDeck, some additional code may be required, and we have multiple places to find out how.
Slide Progression API
SlideDeck comes with a slide control API to control your SlideDeck externally by your own custom navigation elements. Design your own previous and next buttons, separate navigation and use the Slide Progression API to control your SlideDeck.
Slide Control Logic API
Control what slides your users can access on the fly; use the Slide Control Logic API to create easy to use, controlled, stepped interactions for signup forms, product configurations, surveys, etc.
Call Back API
Run functions before and after animating between slides on your SlideDeck. Run your own custom animations, reactions, and process after moving to specific slides.
Mouse Control
Enhance the experience of your SlideDeck by allowing users to seamlessly scroll through slides.
xnxx popüler pornolar rus porno porno
INSTALLATIOIN
SlideDeck requires jQuery 1.3+ to run and has only been tested in XHTML 1.0 Transitional and XHTML 1.0 Strict DOCTYPEs. Both the Lite and Pro versions of SlideDeck are distributed with a minified version of jQuery 1.3.2, or you can get the latest version from the jQuery website. Make sure your website is capable of using jQuery and one of the XHTML DOCTYPEs before implementing SlideDeck.
Currently our supported browsers are FF 3.6 and newer, Internet Explorer (IE) version 8 and newer, Safari 4 and newer, Google Chrome (sorry, FF2 and FF3.0 are not supported due to lack of CSS transform support). SlideDeck will even work with some third-party libraries such as cúfon.
1. Add the SlideDeck skin CSS file
This is not a necessary file to include as you can always customize the CSS within your primary CSS file, but it will be easier to edit by keeping things separate. Be sure to add your CSS file before your Javascript.
<link rel="stylesheet" href="slidedeck.skin.css" type="text/css" media="screen">
2. Include the necessary JavaScript files
Add the JavaScript include tags to the <head> tag in your HTML to load jQuery and the SlideDeck plugin library.
<script type="text/javascript" src="jquery-1.3.2.min.js"></script>
<script type="text/javascript" src="slidedeck.jquery.js"></script>
You may optionally include a jQuery Mouse Wheel Extension to take advantage of mouse wheel functionality for SlideDeck.
SlideDeck also has support for the cúfon font treatment library; please include cúfon in the <HEAD> and define Cufon.replace(); entries before loading SlideDeck.
3. Create a definition list
SlideDeck uses the semantic definition list markup tag to build its structure. The SlideDeck plugin will automatically try and detect how large it should build itself if nothing is defined, but you can always specify dimensions in the skin’s CSS file.
<div id="slidedeck_frame" class="skin-slidedeck">
    <dl class="slidedeck">
        <dt>Slide 1</dt>
        <dd>Slide Content</dd>
        <dt>Slide 2</dt>
        <dd>Slide Content</dd>
        <dt>Slide 3</dt>
        <dd>Slide Content</dd>
        <dt>Slide 4</dt>
        <dd>Slide Content</dd>
        <dt>Slide 5</dt>
        <dd>Slide Content</dd>
    </dl>
</div>
4. Fire plugin using jQuery selector
It is recommended that you run the slidedeck(); action inline immediately after the close of the <dl> tag. If you are not familiar with jQuery, please, read at least this tutorial for beginners.
<div id="slidedeck_frame" class="skin-slidedeck">
    <dl class="slidedeck">
        <dt>Slide 1</dt>
        <dd>Slide Content</dd>
        <dt>Slide 2</dt>
        <dd>Slide Content</dd>
        <dt>Slide 3</dt>
        <dd>Slide Content</dd>
        <dt>Slide 4</dt>
        <dd>Slide Content</dd>
        <dt>Slide 5</dt>
        <dd>Slide Content</dd>
    </dl>
</div>
<script type="text/javascript">
    // The most basic implementation using the default options
    $('.slidedeck').slidedeck();
</script>
<!-- Help support SlideDeck! Place this noscript tag on your page when you deploy a SlideDeck to provide a link back! -->
<noscript>
    <p>Powered By <a href="http://www.slidedeck.com" title="Visit SlideDeck.com">SlideDeck jQuery Slider</a></p>
</noscript>
Thats it! Now you have a SlideDeck on your website. Start flowing in HTML content for each slide in the <dd> tags and change slide titles in the <dt> tags.
OPTIOINS
You can pass a few different custom parameters to change the way that SlideDeck is presented and interacted with. Just pass a single object to the .slidedeck(); action.
Formatting customization options
$('dl.slidedeck').slidedeck({
    speed: 1000, // one second for the sliding to complete
    autoPlay: true, // auto play turned on
    index: false, // hide the spine numbers
    transition: 'linear' // slide transition style
}).vertical();
| speed |
Integer – The speed in milliseconds at which the movement of each slide happens (default:500). |
|---|---|
| transition |
String – The easing method to transition between each slide. jQuery by default only has'linear' and 'swing' as options, so you will need to load an additional jQuery easing library for more options. (default: 'swing') |
| slideTransition |
String – This option changes the default slide transition to fade, flip, flipHorizontal,stack. (default: slide) |
| start |
Integer – The slide to start on (default: 1) |
| index |
This option can be passed a boolean value to turn on/off the slide indexes. You can also optionally pass an array for the index labels. (default: true) |
| scroll |
Boolean – This option can be passed a boolean value to turn on/off the mouse wheel scrolling ability (which requires a mouse wheel extension to operate). You can also set this to the string value 'stop' to prevent the window from scrolling when the mouse cursor is hovering over the SlideDeck. (default: true) |
| keys |
Boolean – This option can be passed a boolean value to turn on/off the ability to navigate the SlideDeck with the left and right arrow keys (default: true). |
| activeCorner |
Boolean – Add a tag to each slide that will act as a small indicator overlapping the content (default: true). |
| hideSpines |
Boolean – Hide the spines (slide titles) for each slide to get more space for your slides (default:false). |
| autoPlay |
Boolean – Automatically progress through slides. AutoPlay will stop autoplaying if a user interacts with the SlideDeck navigation (default: false). |
| autoPlayInterval |
Integer – The interval at which the slides should progress at in milliseconds. This option is only used if autoPlay is turned on (default: 5000). |
| cycle |
Boolean – Automatically cycle the SlideDeck back to the first slide when using the keyboard or mouse to navigate. This feature is also useful when used in conjunction with the autoPlayoption (default: false). |
| controlProgress |
Boolean – Lock down slides to prevent the user from interacting with the SlideDeck. Use the.progressTo(#) method go to a slide and unlock access to the slides between. This option is useful for controlled, multi-step forms (default: false). |
| cufonRefresh |
String – Specify the slide titles to be refreshed upon slide animation when using cufon font treatment on slide titles. NOTE: When you define Cufon.replace() definitions, it is recommended you specify a definition specifically for your slide titles and then pass that specification to this option.
// Have a Cufon.replace() action specifying the slide titles
Cufon.replace('dl.slidedeck dt');

// Pass the CSS path to the cufonRefresh option
$('dl.slidedeck').slidedeck({
    cufonRefresh: 'dl.slidedeck dt'
});
|
| complete |
Function – Pass a function to run after the user has moved to a slide. This function will be run on each slide and receives the SlideDeck object as a parameter so it can be interacted with in the function.
$('#deck_1').slidedeck({
    complete: function(deck){
        // Alert the current slide number after animating
        alert(deck.current);
    }
});
|
| before |
Function – Pass a function to run before the user has moved to a slide. This function will be run on each slide and receives the SlideDeck object as a parameter so it can be interacted with in the function.
$('#deck_1').slidedeck({
    before: function(deck){
        // Alert the current slide number before animating
        alert(deck.current);
    }
});
|
| touch |
Boolean – This option can be passed a boolean value to turn on/off touch support for the SlideDeck. On by default (default: true). |
| touchThreshold |
Object- This option can be passed an object with the keys of x & y and values as integers. This controls the distance threshold for supported touch devices. The higher the coordinate value the greater the gesture movement is required to perform a swipe action (default: { x:50, y:50} ).
// Set the touchThreshold to 100 for both x & y
$('dl.slidedeck').slidedeck({
    touchThreshold: {x:100, y:100}
});
|
API
Once you have created a SlideDeck you can then control it and interact with it. It is easiest to interact with by assigning the firing of the method to a variable first. The SlideDeck plugin will return a single object if only one SlideDeck is created and will return an array of SlideDeck objects if multiple are created.
NEW! You can now interact with a SlideDeck after it has been created without assigning it to a variable first. This will allow you to chain SlideDeck commands and interact with it more like you would with jQueryUI widgets.
<dl id="deck_1" class="slidedeck">
    <dt>Slide 1</dt>
    <dd>Slide Content</dd>
    <dt>Slide 2</dt>
    <dd>Slide Content</dd>
    <dt>Slide 3</dt>
    <dd>Slide Content</dd>
</dl>

<dl id="deck_2" class="slidedeck">
    <dt>Slide 1</dt>
    <dd>Slide Content</dd>
    <dt>Slide 2</dt>
    <dd>Slide Content</dd>
    <dt>Slide 3</dt>
    <dd>Slide Content</dd>
</dl>

<script type="text/javascript">

    // Returns an array of all the SlideDecks created
    var slidedecks = $('dl.slidedeck').slidedeck();

    slidedecks[0];  // The first deck in the array
    slidedecks[1];  // The second deck in the array

    // Returns the SlideDeck object
    var deck_1 = $('#deck_1').slidedeck();

    deck_1;     // The single deck

    // NEW! Interact with SlideDecks without assigning them to a variable
    $('#deck_1').slidedeck().next()

</script>
Callback Options
Optionally pass a single callback function to the interaction methods to trigger the function after animation has completed. You can also pass an object defining before and complete functions to run a function prior to animating and after animation has completed. These callbacks will be accepted by the .next(), .prev(), and .goTo() actions.
// Pass a single function as a callback
deck_1.next(function(deck){
    alert(deck.current);  // Alert the current slide number after animating
});

deck_1.prev(function(deck){
    // Callback interactions...
});

// Pass an object with before and complete callback actions
slidedecks[0].goTo(2,{
    before: function(deck){
        alert(deck.current);  // Alert the current slide number before animating
    },
    complete: function(deck){
        alert(deck.current);  // Alert the current slide number after animating
    }
});
Interact with the SlideDeck
Pass movement commands to the SlideDeck instances by referencing the variables they were assigned to.
| next() |
Move the SlideDeck to the next slide. |
|---|---|
| prev() |
Move the SlideDeck to the previous slide |
| goTo(int) |
Integer – Move the SlideDeck to a specific slide, accepts an integer for which slide to go to.
// Go to the third slide
$('#deck_1').slidedeck().goTo(2);
|
| current |
Integer – Get the current slide number; returns an integer of the current slide number. |
| pauseAutoPlay |
Boolean – This parameter takes a boolean value (
// Get whether or not the SlideDeck autoPlay is paused
// Returns true or false
$('#deck_1').slidedeck().pauseAutoPlay

// Pause the autoPlay on a SlideDeck
$('#deck_1').slidedeck().pauseAutoPlay = true;

// Resume autoPlay on a SlideDeck
$('#deck_1').slidedeck().pauseAutoPlay = false;
|
| updateControlTo(int) |
Integer – When the controlProgress is set to true, you can change up to which slide the user has access to. Pass an integer value to this method to enable slides up to the passed slide number.
// Enable access up to slide 4
$('#deck_1').slidedeck().updateControlTo(4)
|
| progressTo(int) |
Integer – When the controlProgress is set to true, you can progress a user to a locked slide. This will do the same thing as the updateControlTo() method, but also move the user to the specified slide.
// Enable access up to slide 4 and go to slide 4
$('#deck_1').slidedeck().progressTo(4)
|
| disableSlide(int) |
Integer – Disable access to a slide. If the user tries to go to that slide, they will be directed to the nearest available slide they can access (i.e. if slide 3 is disabled, trying to go to slide 3 will take them to slide 4).
// Disable the third slide
$('#deck_1').slidedeck().disableSlide(3);
|
| enableSlide(int) |
Integer – Enable access to a slide.
// Enable the third slide
$('#deck_1').slidedeck().enableSlide(3);
|
| loaded() |
Function – Run when the SlideDeck has been loaded(completely built and ready to interact with). Great for running custom JavaScript for the binding of events or outputting custom elements that require the SlideDeck to have been built.
// Loaded method
$('#deck_1').slidedeck().loaded(function(){
    // Custom JavaScript Here
});
|
VERTICAL SLIDES
New to SlideDeck Pro, vertical slides allow you to navigate both horizontally across slides and vertically within a slide. See slide 2 of the Home page SlideDeck for an example of how this interaction can work.
To setup vertical slides in your SlideDeck is pretty straight-forward. Just add a <ul class="slidesVertical"> element to your slide’s content. Each <li> in this element will contain the content for that vertical slide. Navigation will automatically be created for you.
Start with code similar to this:
<dl id="my_slidedeck" class="slidedeck">
    <dt>Slide 1</dt>
    <dd>
        <ul class="slidesVertical">
            <li><p>Vertical Slide 1</p></li>
            <li><p>Vertical Slide 2</p></li>
            <li><p>Vertical Slide 3</p></li>
            <li><p>Vertical Slide 4</p></li>
        </ul>
    </dd>
    <dt>Slide 2</dt>
    <dd>Slide Content</dd>
    <dt>Slide 3</dt>
    <dd>Slide Content</dd>
</dl>

<script type="text/javascript">

    // Setup a SlideDeck with the <dl id="my_slidedeck"> element
    // and create the vertical slide navigation on the slides.
    $('#my_slidedeck').slidedeck().vertical();

</script>
New to 1.2.5 – You can also use a <dl> structure for your vertical slides with version 1.2.5. The title text in the <dt> elements is used for the automatically generate nav element text. It looks something like this:
<dl id="my_slidedeck" class="slidedeck">
    <dt>Slide 1</dt>
    <dd>
        <dl class="slidesVertical">
            <dt>Vertical Slide 1 Title</dt>
            <dd>Vertical Slide 1 Content</dd>
            <dt>Vertical Slide 2 Title</dt>
            <dd>Vertical Slide 2 Content</dd>
            <dt>Vertical Slide 3 Title</dt>
            <dd>Vertical Slide 3 Content</dd>
        </dl>
    </dd>
    <dt>Slide 2</dt>
    <dd>Slide Content</dd>
    <dt>Slide 3</dt>
    <dd>Slide Content</dd>
</dl>

<script type="text/javascript">

    // Setup a SlideDeck with the <dl id="my_slidedeck"> element
    // and create the vertical slide navigation on the slides.
    $('#my_slidedeck').slidedeck().vertical();

</script>
You must run the .vertical(); command on your initiated SlideDeck to enable the vertical navigation. Just make sure that the<ul> tag that you want to be a vertical SlideDeck has the slidesVertical class for it to be picked up and converted.
Navigation will be automatically created
After you have run the .vertical(); command, a new element will be added to each slide that contains a set of vertical slides. This element is added to navigate through the vertical slides and has a markup that will look like this:
<ul class="verticalSlideNav">
    <li class="nav_1 active">
        <a href="#1">Nav 1</a>
    </li>
    <li class="nav_2">
        <a href="#2">Nav 2</a>
    </li>
    <li class="nav_3">
        <a href="#3">Nav 3</a>
    </li>
    <li class="nav_4">
        <a href="#4">Nav 4</a>
    </li>
    <li class="arrow"> </li>
</ul>
The <li> </li> element at the bottom of this list will be an indicator of the current slide that will animate behind the individual navigation link.
Vertical slide installation options
Just like the horizontal SlideDeck, you can pass options to the vertical slides when you create them. For example:
$('#my_slidedeck').slidedeck().vertical({
    speed: 250,    // Set the animation speed to 250 milliseconds
    scroll: true   // Allow mousewheel scrolling
});
| speed |
Integer – The speed in milliseconds at which the movement of each slide happens (default:500). |
|---|---|
| scroll |
Boolean – Turn mousewheel scrolling on or off (default: true). |
| continueScrolling |
Boolean – When scrolling through vertical slides using the mouse wheel, this option will allow the deck to progress horizontally when the end of a vertical slide is reached. (default: false). |
| before |
Function – Pass a function to run before the user has moved to a slide. This function will be run on each slide and receives the SlideDeck object as a parameter so it can be interacted with in the function.
$('#deck_1').slidedeck().vertical({
    before: function(deck){
        // Alert the current slide number before animating
        alert(deck.current);
    }
});
|
| complete |
Function – Pass a function to run after the user has moved to a slide. This function will be run on each slide and receives the SlideDeck object as a parameter so it can be interacted with in the function.
$('#deck_1').slidedeck().vertical({
    complete: function(deck){
        // Alert the current slide number after animating
        alert(deck.current);
    }
});
|
Interact with your vertical slides
Pass movement commands to the SlideDeck instances by referencing the variables they were assigned to.
| vertical().next() |
Move to the next vertical slide on the current horizontal slide in your SlideDeck. If no vertical slides are found on the current slide, this just returns false.
// Go to the next vertical slide on the current horizontal slide
$('#my_slidedeck').slidedeck().vertical().next();
|
|---|---|
| vertical().prev() |
Move to the previous vertical slide on the current horizontal slide in your SlideDeck. If no vertical slides are found on the current slide, this just returns false.
// Go to the previous vertical slide on the current horizontal slide
$('#my_slidedeck').slidedeck().vertical().prev();
|
| vertical().goTo(int) |
Integer – Move to a specific vertical slide, accepts an integer for the slide to go to. If no vertical slides are found on the current slide, this just returns false.
// Go to the third vertical slide on the current horizontal slide
$('#my_slidedeck').slidedeck().vertical().goTo(3);
|
| goToVertical(v,h) |
This method takes two arguments: If you would like to go to the 2nd vertical slide on the 3rd horizontal slide:
$('#my_slidedeck').slidedeck().goToVertical(2,3);
NOTE: If you tell the SlideDeck to move to a vertical slide on a different horizontal slide that you are currently viewing, the vertical slide will automatically be snapped to instead of being animated to. This is to make the vertical slide’s content immediately visible when the SlideDeck has finished animating for a seamless experience. If you want to go to the 2nd vertical slide no matter which horizontal slide you are on:
$('#my_slidedeck').slidedeck().goToVertical(2);
|
 JS Tutorial


